Sourdough Neapolitan-Style Pizza Dough 2.0
Newsletter
Sign up at the bottom of this page for the free Chic Eats newsletter. It includes new recipes along with a grab bag of curated content that was interesting enough to share around the dinner table.
Version 2.0
This naturally-leavened Neapolitan-style pizza dough was inspired by a conversation I had with Pizzicletta's chef-owner, Caleb Schiff. My first version is made with 00 flour and is on the site here. I've heard from readers over the years that they enjoy the method, even using it annually for birthday celebrations so it's a solid recipe. I made dozens upon dozens of pizzas with it, but over time my style changed slightly. The dough in this post also uses a different flour blend.
Please don't hesitate to leave a comment if you have questions or need clarification.
But first...
Healthy Food Pet
The most important lesson that this sourdough journey continues to teach me is that my starter, Moomin, needs to be thriving. No amount of fancy strengthening or shaping will make up for a lack of nurturing. You want to feed the starter consistently, and it should rise and fall predictably. The smell will be sweetly fermented with a hint of acidity when ripe—train your senses to be in tune with the process. Becoming one with your food pet will help it grow up and achieve its full fermentation potential.
For this recipe, your sourdough starter should be at or slightly past peak—that is, just beyond doubling—when you mix the dough. Back to the topic of smell, there's a noticeable difference in acidity between a starter at peak and one that has been resting in the deflated stage. Train your nose to know—it's one of your best tools when working with sourdough. Additional info can be found in How to Make and Maintain Sourdough Starter.
Recipe Tips
Data Points
There are numerous factors that contribute to fermentation, but temperature is one of the most important. Stabilizing at an optimal temperature also helps keep the timing relatively consistent and predictable. I recommend aiming for a dough temperature (DT) around 76°F for bulk and strengthening. It's not going to break your pizza if the DT is a little lower (mine often is), the process just may take longer.
Baker's Best Friends
Your scale and digital thermometer are your best friends. Scooping and scraping with measuring cups adds unhelpful inconsistencies into the process.
No Proofing Box, No Problem
I added a Brod & Taylor proofing box to my kitchen so that's what I use now. But for more years than I can count, a warm water bath was how I brought the dough up to its target temperature. Simply fill a deep sauté pan with warm water and then place the bowl of dough directly in the bath. Generally speaking, I use 90°F water when the dough is 70°F, 85°F water when the dough is 75°F, and so forth. You can also turn the oven light on and that warmth usually maintains the target dough temperature (DT). Sometimes the oven can be too warm if it's a hot day so always keep an eye on things until you're comfortable with this method. For context, my home is usually about 71–75°F/22-24°C.
Flour
I didn't have any 00 flour one weekend (my 00 recipe is here), and ended up using Central Milling's ABC which is the main flour in my Sourdough Sicilian. For the whole grain—aka "flavor flour"—I went with 10% India-Jammu from Grist & Toll. It's a stretchier crust and didn't have quite the same crispness that 00 flour provides, but it was excellent in its own right.
Sticky Situation
When properly floured and proofed, this pizza dough should not stick to your hands, the counter, or the pizza peel. You can use a heavy hand to dust when stretching the pie skin and somehow it all melts away by the time you pull it out of the oven. That being said, I try to get all of my dusting done in one shot. I generously flour the workbench and then, after placing the dough on the counter, generously flour the top. You're not rolling the dough so only the flour that needs to stick will stick. If your dough is tacky or hard to work with after following these steps, it may be underproofed or too hydrated.
Oven
I bake my Neapolitan pizza in a Roccbox that has a deck temperature of 750–800°F. If using the oven, bake at 500–525°F and consider a quality baking surface such as a pizza stone or baking steel. You can also place it on the oven floor for maximum heat if doing that isn't a hazard for your equipment. Preheat the baking stone or steel for 40 minutes.
Terms
The terms "sourdough starter", "mother", "seed", and "levain" are tossed around and I thought it was worth clarifying my understanding of them.
- Mother/Seed/Sourdough Starter - These are all the same to me. This is the food pet that you feed and maintain indefinitely.
- Levain - At a high level, levain is a portion of the starter that is destined for the bread dough. For example, some people maintain their mother/sourdough starter/seed with 100% all-purpose flour. A day or two before mixing their bread, they fork off some of the starter and feed it with some percentage of whole wheat. This whole wheat mixture is then used as the leaven in the bread dough.
- Starter/Levain - In the case of this recipe, starter and levain mean the same thing. I don't fork the starter to build a levain with a different flour composition but I do have a specific feeding pattern leading up to the mix.
There are always more complicated explanations available on the Internet, but for my purposes I'm keeping it simple.
Farmers | Artisans
I make an effort to source my food from California artisans with a special focus on the Santa Monica Farmers Market. Below is a list of the folks who contributed to this dish.
- Central Milling // ABC
- Grist & Toll // Whole Grain Flour
- Trattore Farms // Olive Oil
- Katz Farm // Olive Oil
Tools
- Roccbox - I've owned this pizza oven for two years and use it almost every week. As can be seen in my naturally-leavened pizza posts here and here, the results are top notch. The oven is portable, easy to use, and requires virtually no maintenance. It's an investment but I highly recommend it.
- OXO Scale - Measure all the things. I've been using this scale for many years and it has done a great job.
- Thermapen - I use my Mk4 daily for sourdough, coffee, meat, quick breads (doubles nicely as a cake tester), and more. It's fast, nimble, and a snap to clean.
- Pastry Scraper
My Favorite Cooking Tools spotlights the kitchen equipment I have owned and used for years.
Timeline
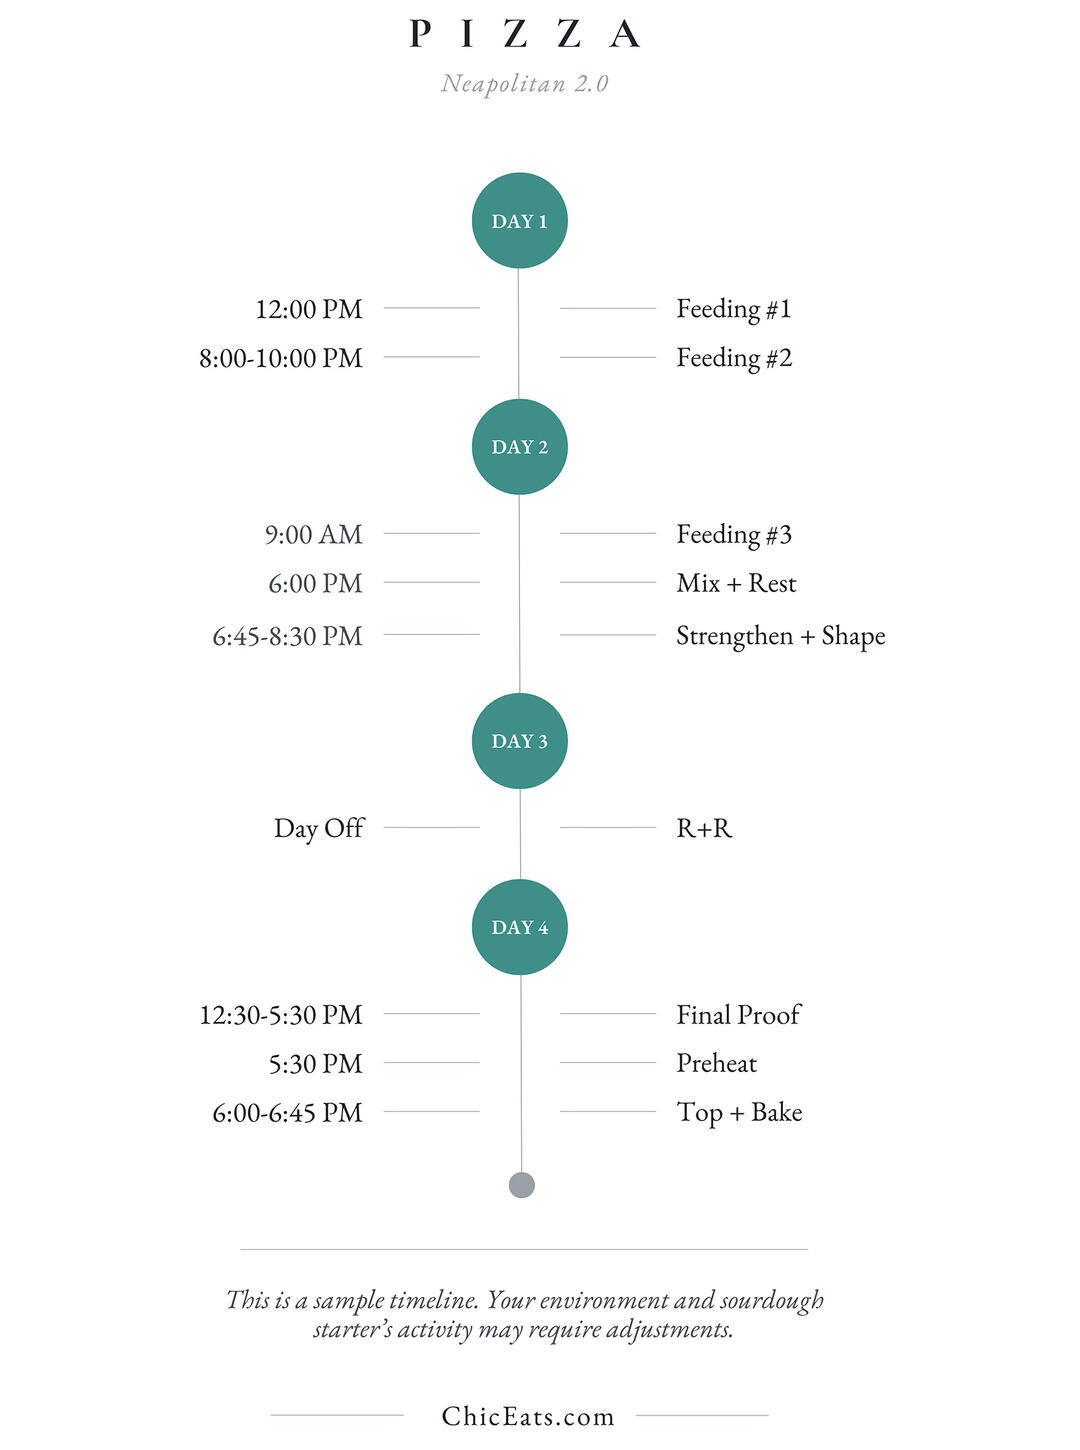
I find these kinds of overview graphics helpful and decided to make one. It's intended as a general roadmap and assumes you've read the full recipe.
Ingredients for Dough (makes two 230-gram / 8-ounce rounds)
Levain/Leaven Build
- Healthy Sourdough Starter
- 90 grams Central Milling Organic Beehive (or unbleached all-purpose)
- 90 grams Grist & Toll Sonora (or whole wheat of choice)
Pizza
- 275 grams flour (total) || 100%
- 248 grams Central Milling Organic ABC Craft Plus || 90%
- 27 grams whole grain flour || 10% Note: I use India Jammu or Hard White from Grist & Toll.
- 22 grams ripe sourdough starter (85% hydration) || 8%
- 179 grams filtered water || 65%
- 5 grams barley malt syrup || 1.8%
- 6 grams fine sea salt || 2.2%
Instructions
Detailed instructions for sourdough starter feeding and maintenance can be found here.
Day 1
Levain/Leaven Build
Note: I don't maintain my starter at 100% hydration so these ratios will be different if 1:1 is what you're used to. The mixture is a little "stiffer" meaning there is more flour than water added during each feeding. Also, the starter should smell like fresh flour after a feeding. If the nose is acidic even after the refresh, consider lowering the inoculation (i.e. increase the fresh flour and water relative to the mature starter). Hot weather, missed feedings, or other environmental conditions can cause this to happen. Times included as a point of reference.
Feeding 1 - 12:00 p.m.
Combine the following ingredients, mix thoroughly, and place in a warm area (preferably 73–75°F/23-24°C).
- 30 grams mature starter || 50% inoculation
- 51 grams room temperature (73–75°F/23-24°C) filtered water || 85% hydration
- 30 grams Grist & Toll Sonora (or whole wheat of choice)
- 30 grams Central Milling Organic Beehive (or unbleached all-purpose)
Feeding 2 - 8:00–10:00 p.m.
Combine the following ingredients, mix thoroughly, and place in a warm area (preferably 73–75°F/23-24°C). If I remember, I stir the mixture once more before going to sleep.
- 10 grams mature starter || 16.6% inoculation
- 51 grams room temperature (73–75°F) filtered water || 85% hydration
- 30 grams Grist & Toll Sonora (or whole wheat of choice)
- 30 grams Central Milling Organic Beehive (or unbleached all-purpose)
Day 2
At this point, you should have a feel for how long it takes your starter to double at different inoculations. Adjust accordingly so that the starter isn't too far beyond peak when you mix in the afternoon/evening. I go with about 50% depending upon the time of day. That said, trust your nose. If the bowl smells acidic immediately after being refreshed, then 50% may be too high. A freshly fed starter should smell like fresh flour—almost sweet by comparison.
Feeding 3 - 9:00 a.m.
Combine the following ingredients, mix thoroughly, and place in a warm area (preferably 73–75°F).
- 30 grams mature starter || 50% inoculation
- 51 grams room temperature (73–75°F) filtered water || 85% hydration
- 30 grams Grist & Toll Sonora (or whole wheat of choice)
- 30 grams Central Milling Organic Beehive (or unbleached all-purpose)
Mix & Rest - 6:00 p.m.
- Once the starter is mature (see "Healthy Food Pet" above), portion out 22 grams in a medium bowl, add 179 grams of filtered room temperature water, 5 grams of barley malt syrup, and dissolve the starter and syrup thoroughly.
- In a second bowl, whisk together 6 grams fine sea salt, 248 grams ABC, and 27 grams whole grain flour. Add the flour mixture to the dissolved sourdough starter, then squeeze and press it until well combined. Note: This is a stiff dough so inspect it to make sure there aren't any dry flour bits lurking. The dough will hydrate and relax with time—though it seems more like magic—so resist adding any additional water.
- Once well mixed, cover the bowl and set a timer for 30 minutes—that was fold #1. It's also good to check your dough temperature, in my case it's usually around 73–75°F which works well for my sourdough starter. See the Recipe Tips above for notes on keeping your dough warm.
Strengthen - 6:45–8:30 p.m.
- Fold #2: With barely damp hands, pick the dough up and gently stretch it out. I do this by jiggling, rotating a quarter turn, then jiggling and gently stretching some more until it's 8–10 inches across. Think of the dough as having four quadrants—south, east, west, and north—and fold the four sides in like a package then place the dough seam-side down in the bowl. Cover and set a timer for 30 minutes.
- Fold #3 and fold #4: Repeat the above step 2 more times with a 30-minute rest in between fold #3 and #4. The dough may stretch out a little less as it gets stronger so don't force it—you don't want it to tear. Once fold #4 is complete, set a timer for 30 minutes.
Shape
- Meanwhile, lightly grease two containers with olive oil (or one larger container). I keep the dough rounds adequately separated so they don't end up touching as they rest and relax. This is fussy since, if you've ever watched restaurants make pizza, they usually have to cut the rounds apart when reaching into the bin.
- 30 minutes after fold #4 was completed, place your dough on the workbench seam-side down. With a pastry scraper or similar, cut the dough in half then weigh each piece to ensure they're even (about 227–235 grams or 8–8 1/4 ounces each). Now let's create the pizza balls. Note: The dough loses a little weight during fermentation, so the final dough balls can fall a bit short of the ingredient total.
- For each round of dough, gently press and flatten it into a disk 5 to 6 inches wide. Pick the dough up, flip it over in your hand, and then fold the edges inward to form a package. Place the dough "package" on the workbench seam-side down, then gently round by pulling it towards your body using cupped hands or a bench scraper. The dough will lightly stick to the counter which creates tension. Be gentle but firm and don't force so much tension that it tears. Pick the dough up and lightly pinch and close any open parts of the seam.
- Place the rounded dough seam-side down in the oiled container(s), cover securely, and refrigerate.
Note: My shaping is basically the same as Nancy Silverton's method in this video minus the workbench flour. Also my dough isn't that sticky.
Day 3
This is the dough's spa day so it's just going to chill. It should be spreading out a bit but the edges will still be slightly rounded. There isn't much rise during this period though you may see a few small bubbles forming on the surface.
Day 4
Final Proof
12:30 p.m.
- Set the dough out at room temperature, preferably in a warm part of the house (73–75°F).
5:30 p.m.
"Ready" is a spectrum, but generally you're looking for bubble development on the bottom of the round (this is why translucent or clear containers are helpful). It should be airy and light in hand and will be slightly tacky but not sticky. For a recent dinner, my dough came out of the refrigerator at 12:30 p.m. and sat at room temperature. The bake at 6:00 p.m. was good, but the 6:45 p.m. pizza was better so the dough clearly still had some runway.
Preheat
- When you're 40–45 minutes from baking, turn on the oven or fire up the Roccbox. Per the "Oven" tip towards the top, my Roccbox deck clocks in around 750–800°F. An oven should be 500–525°F with a pizza stone.
Mise en Place
- Assemble the ingredients and any other tools that you might need. Note: I can't emphasize enough how important it is to have everything ready before stretching your dough.
- Flour the workbench thoroughly with ABC flour and then keep extra flour over to the side for your hands and dusting the top of the dough.
Sprinkle your pizza peel with semolina.I don't use semolina anymore, but also don't advocate against it. I find that the dough slides easily off the peel when properly proofed and floured on the workbench. That said, semolina can be an insurance policy if you find your dough sticks.
Stretch
6:00 p.m.
I intentionally overuse "gently" in this section. You're not trying to be a pizzaiolo hero who's ready for their close-up. Be nice to your dough.
- Flour your hands, then gently work your fingers under the dough and lift your pizza dough ball out of the container and place on the floured workbench seam-side down as it was in the box (though there's not a seam at this point). The dough should be pillowy and easy to handle though it may be a touch tacky at first. This issue will resolve with the flour.
- Slide the dough around on the workbench to flour the bottom and ensure that there's no sticking. Generously sprinkle the top with flour.
- Put your hands side-by-side, and then using the tips of your fingers, tap-tap-tap the dough from the center to the edge, making sure to stop 1 inch from the edge (that inch is important). The untouched dough will be lovely and full of fermented potential.
- Gently slide the dough around again to make sure the bottom is properly floured. Using your fists and avoiding that outside rim, gently rotate the dough until the size is about 10 inches across. The "bottom" of the pizza dough should be touching your hand. The process should be relatively quick as the dough is relaxed and gravity will be helping things along.
Top & Jiggle
6:00–6:45 p.m. (range assumes two pizzas)
- Transfer the stretched pie skin from your fists to the pizza peel.
- Add your toppings.
- Jiggle the peel to ensure that the dough isn't sticking. If it sticks (usually somewhere around the edge when it happens), gently lift that part of the dough and sprinkle a little semolina or flour on the problematic spot.
- Bake, then repeat for the second pizza.
Newsletter
Sign up at the bottom of this page for the free Chic Eats newsletter. It includes new recipes along with a grab bag of curated content that was interesting enough to share around the dinner table.