How to Make and Maintain a Sourdough Starter (aka Levain)
UPDATE: I finally posted How Make a Naturally-leavened Sourdough Bread. Included are tips, video links, a copy of my note-taking spreadsheet, and detailed instructions.
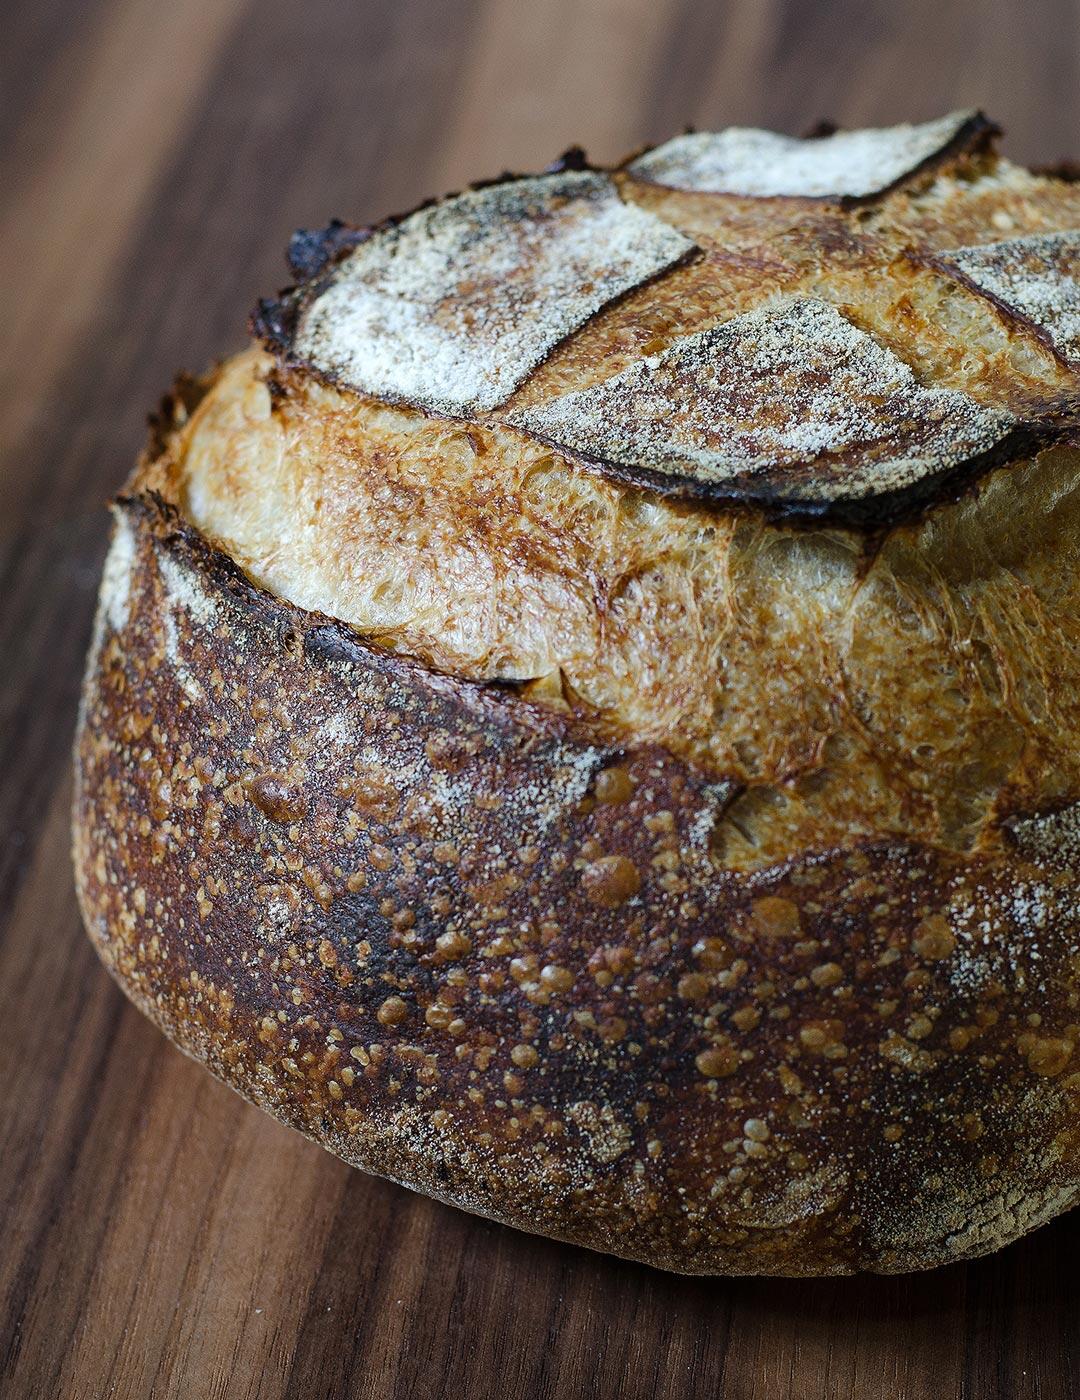
I'm not entirely sure how it happened, but somewhere along the way I discovered and fixated on baking bread. Specifically, I'm referring to bread made in its purest form using only flour, water, and salt. I never cease to be in awe of how three humble ingredients can transform into one of the most delicious and comforting foods. In the interest of being overly dramatic, the fact that I made these with my own two hands is pretty magical.
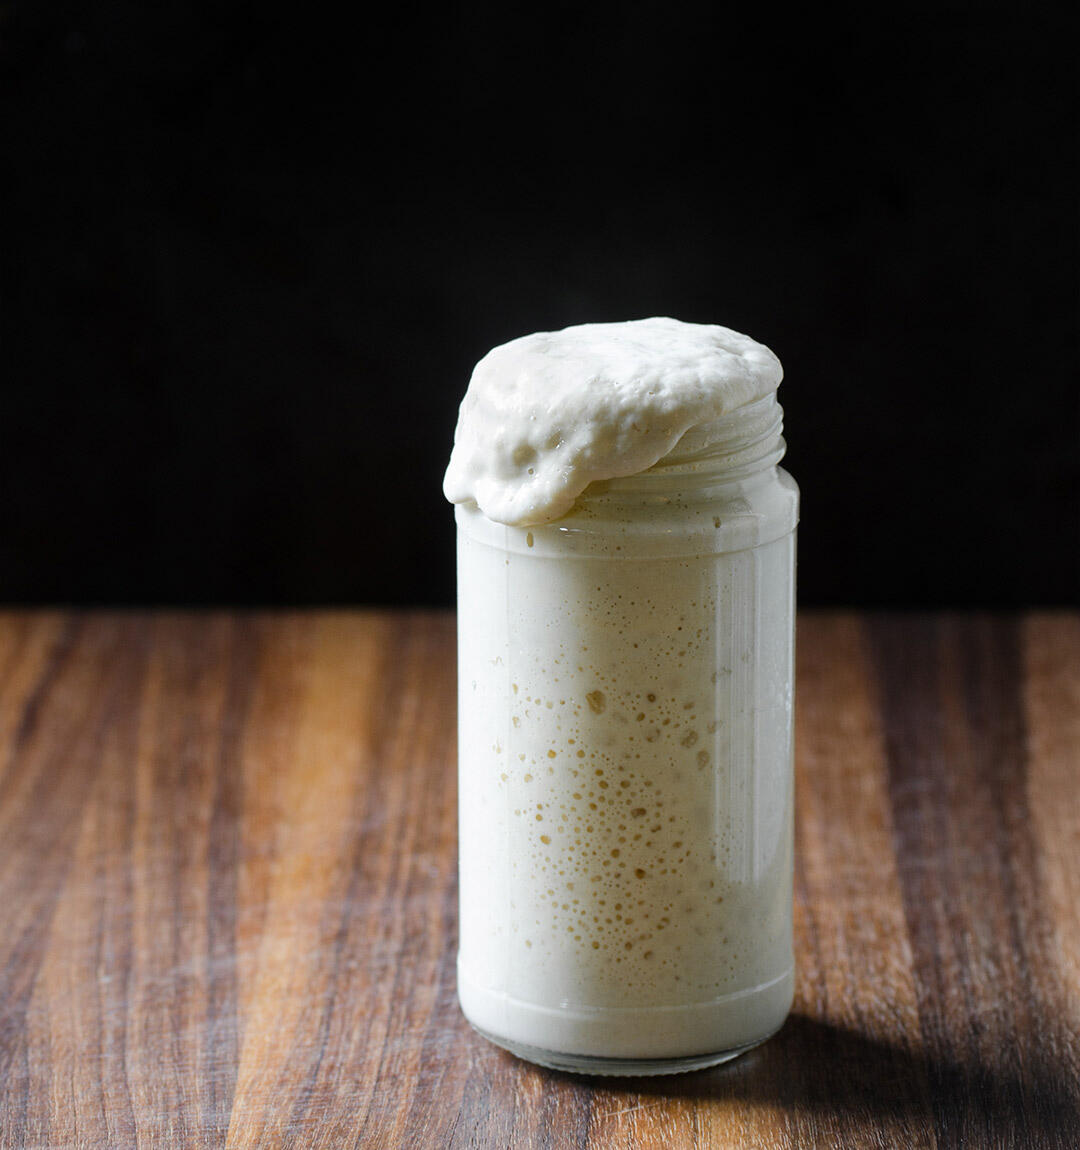
"Slow bread" requires a sourdough starter (or levain) so that was my first project. Levain is a mixture of water and flour that has been converted into a leavening agent through the process of fermentation. Not only is microbiology+food fun, but you need to "feed" the starter regularly and it's apparently bad luck if you don't name it. So basically it's a food pet. (My starters are named "Moomin" and "NYoomin".)
When I first began caring for my sourdough starter, I was neurotic about feeding times and measurements. I have since learned that mature or established yeast are quite resilient so there's a certain amount of flexibility in the process. Once you get a feel for how your established starter behaves, you'll develop a personalized approach. With that said, try to be relatively consistent for the first couple of weeks to get your leaven up and running.
This post streamlines what I've learned so you can create a fermented food pet to call your own. I'm happy to answer any questions about the process so just leave a comment.
The Fundamentals
I could travel down the rabbit hole on some of these topics, but in the interest of publishing this post before next year I'm going to try and get to the point.
What is a sourdough starter?
Wild yeast are fungi and exist everywhere - in flour, on our bodies, and in the air. By fermenting water and flour, you're growing colonies of both wild yeast and "good bacteria" or lactobacilli. Here's the brief explainer:
- Bacteria or Lactobacilli - The bacteria's main job is to turn your sourdough starter into an acidic environment. This acidity contributes to the sour flavor of your bread and, more importantly, prevents "bad bacteria" from taking hold. The most common question I've seen online is, "Why doesn't the starter make me sick after weeks on the counter?" The answer is bacteria. Counterintuitive but that's why science is awesome.
- Wild Yeast - Commercial yeast can't hang in the above mentioned acidic environment so that's where wild yeast comes in. Not only does wild yeast thrive with the "good bacteria", but colonies of yeast give off carbon dioxide which contributes to the structure and rise of your bread. For the record, bacteria also gives off carbon dioxide but that isn't its main function in the levain.
In summary, your sourdough starter is a goopy utopia where wild yeast and bacteria live harmoniously. It all translates into fantastic flavor and rise for your homemade bread. If you want to geek out, take a few minutes and read this article that discusses the science in more detail.
UPDATE: The terms "sourdough starter", "mother", "seed", "leaven", and "levain" (French for leaven) are tossed around and I thought it was worth clarifying my understanding of them.
- Mother/Seed/Sourdough Starter - These are all the same to me. This is the food pet that you feed and maintain indefinitely.
- Levain/Leavan - At a high level, a portion of the starter that is destined for the bread dough is often referred to as leaven or levain (French for leaven). For example, some people maintain their mother/seed/sourdough starter with 100% all-purpose flour, but then a day or two before mixing their bread, they fork off some of the starter and feed it with 50% whole wheat (for example). This 50% whole wheat mixture is then used as the leaven in the bread dough.
- Confusion - There are more complicated explanations available on the Internets (aren't there always). For my purposes, I'm keeping it simple. I use sourdough starter when talking generally and levain/leaven when I'm actively building up for a bake.
Grams
Embrace measuring in "grams" since it's the most accurate way to approach sourdough starter maintenance and bread baking. And if you don't own a scale it's time to get on that. I have used the OXO model for several years and really like it.
Hydration
A "100% hydration sourdough starter" means it's 1 part water and 1 part flour. In other words, for every gram of flour there's a corresponding gram of water, hence 100% of the flour is hydrated. This is the easiest starter to maintain since most recipes are written with a 1:1 ratio in mind. That being said, increasing or decreasing the hydration can alter the pH which ultimately changes the flavor profile or sourness. I haven't gone down that path but if you want to experiment there's some more info on the subject here.
Feeding and Stirring
I stir during the feeding and then, when possible, one additional time during the rise.
Don't get discouraged by the maintenance and feeding schedule. Once your starter is mature (usually 7-14 days) you can adjust the feedings to fit your life and/or baking habits, or just put the starter in the refrigerator and feed it every week or so. There is also an option to feed the starter every few months if you like having a food pet but only want to bake occasionally. All of this is explained further in the post.
Storage
I don't recommend storing a sourdough starter in a hot location, especially in the beginning when you're trying to establish the colonies. High temperatures can encourage "bad bacteria" to grow which overrun the good bacteria, ruining the mixture. My original starter, "Moomin I", met a quick end because I thought the hottest corner of the kitchen was a brilliant location and would help it grow faster. Not so much. And my friends, you will know if the sourdough starter has gone south. No amount of plastic bags could contain the stench of "Moomin I" when I took it out to the trash. A range of 70-75 degrees seems to be a good temperature.
Once the sourdough starter is mature - bubbling, doubling, and falling predictably - then you're free to put it in the fridge with a loose cover (already mentioned above). The cold temperature "retards" or slows the fermentation which helps spread out the feedings.
Covering Your Sourdough Starter
My preference is to simply lay a dish towel over the bowl - sometimes it's just a couple of paper towels. This prevents anything from falling in while allowing for plenty of circulation. When storing in the refrigerator, I cover the container with plastic and then punch a few holes with a paring knife. UPDATE: I did an experiment and am no longer convinced that completely covering a starter is bad (i.e. limiting the air circulation). That being said, the most popular storage method amongst the IG bread nerd community is partially covered. I'm sticking with partially covered.
Well Behaved
After feeding my levain, I can accurately estimate when it's going to be ready for baking give or take 30 minutes. I'm not a special snowflake, this is just how a mature or established sourdough starter behaves. It rises and falls in a consistent pattern which makes planning your baking schedule a snap. When you feed your starter and begin to see predictable behavior, you're on the right track.
Smell
For the first 1-7 days, a sourdough starter will go through some weird odor stages as the various bacteria get settled. This is normal as long as the smell isn't foul. Like I mentioned above, you'll know when things have gone bad. Once the starter is established, the scent will transition from a sweet smell after feeding to a slightly more acidic/fermented smell as it ripens and peaks.
Is it ready?
Gently drop a spoonful of starter into a cup of water. If the glob floats, then that means it's hopped up on carbon dioxide and ready for baking. No fancy advice here, just make sure it floats. You probably won't need to do this once you get to know your starter.
Tricks
I've seen pineapple juice and various other ingredients suggested as growth aids, but in my humble opinion you only need filtered water and flour to create a starter. I think the issues people run into include the following:
- Water Impurities - The wild yeast can be sensitive to impurities and chlorine (especially when trying to get established) so it's best to use filtered water for the sourdough starter. This seems to be a consistent piece of advice amongst bakers.
- Feeding - Feeding the sourdough starter once a day is fine for the first 7-14 days when you're trying to establish the colonies of good bacteria and wild yeast. That being said, if you feed it too much, the bacteria and wild yeast won't have enough time to multiply and set up shop. If you feed it too little, your microbial friends will run out of food. Once the starter is healthy and established there's more flexibility.
- Flour type - Wheat flours can be finicky so if you're having trouble I recommend using only all-purpose to get a feel for the process.
- Environmental Conditions - If it's very cold in your house, the starter may take longer to get going and it can feel like things aren't progressing. Stick with it and perhaps even skip a feeding day here and there. The colder it is the more lethargic the organisms will be. If it's too hot, your starter may be overrun by "bad bacteria" (mentioned above). If that happens and the mixture smells foul, toss it and begin again.
- Patience - New sourdough starters are a tease. They often bubble up a few days into the process, but then they start smelling a little funny and the bubble activity becomes inconsistent to nonexistent. That's ok. If you go a couple of weeks and the starter isn't rising and falling on schedule then you may have an issue with one of the above factors.
Tools & Resources
- OXO Scale - There are two scales in my kitchen and the workhorse is my OXO. It's a sturdy cooking companion that repeatedly gets covered in flour, sauce, or whatever else is flying around the kitchen.
- Thermapen Digital Thermometer - An important tool for managing dough temperature (DT). I have three Thermapen digital thermometers that are distributed between my home, the Airstream, and my mother-in-law's house. They're fast, easy to clean, and the probe makes a perfect cake tester.
- Tartine Bread // Like many bread bakers, this book got me started on my sourdough journey and occupies one of the four cookbook spots in my kitchen.
- Bread // I frequently reference this book. From recipes to bread science, it's a wealth of useful information.
Additional Bread Baking Tools
- Lodge Cast Iron Double Cooker - Relatively inexpensive pan that has brought endless sourdough bread joy into our life. The pan traps the steam inside during the first 20 minutes of baking (then you remove the lid) which helps develop a beautiful crust. Lodge's double cooker is also great for charring vegetables and cooking tortillas.
- 9" Proofing Basket - Tartine Bread's country recipe (cut in half) is the model for my sourdough and a 9" basket works well for one shaped round of dough.
- Flour Sack Towels - I line the basket with a removable flour sack towel instead of dusting the shaped dough with flour. To transfer the bread from the basket to the hot cast iron pan, I place an upside-down baking sheet firmly on top, turn the basket over, then remove the basket and gently peel off the towel. I can then use the baking sheet like a pizza peel and slide the shaped dough into the pan. Note that the dough that comes into contact with the baking sheet has been thoroughly dusted with a 50/50 mix of whole grain and white rice flour.
- Scoring Lame + Extra Blades - This is the only lame I've owned though there are several different kinds available. In a pinch I've used a single-edge razor but that can be a little tricky around a 500°F pan.
- Dough/Bench Scraper - My right hand tool, or rather it often functions as my right hand. When making Flaky All-butter Pie Dough, the bench scraper is essential since it allows me to chop, scrape, and fold the dough with minimal contact between the butter and my warm hand. Also a necessary tool for shaping and cutting bread dough. I have a dough scraper from Sur la Table (ruler on two sides) and Norpro (ruler on one side - Amazon). Including both options depending on where you prefer to shop.
- Plastic Bowl Scraper - Used primarily for scraping down the sides of the bowl after mixing or when transferring the dough to the work bench. The one I have came with a Central Milling order so the linked item is comparable (both are straight and trapezoidal). Perhaps a rounded side and a flat side would be more useful but I haven't bothered to research that. My free scraper has been doing a solid job for many years now.
- Large Glass Bowl - I've had the same set of nested glass bowls since college. The linked items aren't the same but a bowl is a bowl for these purposes. The glass allows you to see the bubbles forming along the bottom which helps gauge how far along the fermentation is.
Ingredients
- 700g filtered water
- 700g all-purpose flour (or 50/50 blend of all-purpose and whole wheat)
Instructions - A Starter is Born (usually matures after 7-14 days give or take)
Try to feed the starter at roughly the same time each day. Stir the mixture occasionally if your schedule allows.
- Day 1 - Thoroughly mix 100g filtered room temperature water with 100g flour in a bowl at least twice the size of the mixture. Loosely cover with a dishtowel or similar and set in a warm (but not hot) spot.
- Day 2 - On day 1, you combined 100g of flour with 100g of water resulting in a mixture weighing 200g. For the day 2 feeding, scoop out and discard all but 100g of that initial 200g mixture. This means you will be starting with 100g of mixture in the bowl. Now add 100g of filtered room temperature water and 100g of flour to the bowl, stir, and loosely cover. The mixture in the bowl will have a total weight of approximately 300g.
- Day 3 - Repeat day 2 steps. Note: A redundant note to avoid confusion - your mixture should not weigh more than approximately 300 grams after each feeding.
- Day 4 - Repeat day 2 steps.
- Day 5 - Repeat day 2 steps.
- Day 6 - Repeat day 2 steps.
NOTE: At this point you should notice that the starter has cycled through a variety of odors but is starting to stabilize and has a familiar smell. There should also be some bubbling activity depending on the ambient temperature/environment. The goal is for the starter to bubble, double, and then fall predictably. It's not unusual or an issue if your starter isn't ready by day 7 so just keep with it. If after 2 weeks the starter still isn't rising, there may be other factors at play (see "Tricks" above).
Maintaining an Established Starter
Feeding Schedule
UPDATE: I have reduced the inoculation in these feedings since the original posting.
Once a starter is established, I feed it twice a day at a lower inoculation than is called for while building a new sourdough starter. When building a new starter, the ratio of fresh flour and starter is 1:1 (100 grams fresh flour and 100 grams of starter) which puts the inoculation at 100%. Here is the maintenance feeding schedule that I generally use:
- 12:00 P.M. - Combine 15 grams of ripe starter with 50 grams of fresh flour (Sonora and all-purpose blend) and about 42 grams of filtered room-temperature (73-75 degrees) water. This is a 30% inoculation or 1:3.3 ratio of ripe starter and fresh flour.
- 11:00 P.M. - Combine 15 grams of ripe starter with 70 grams of fresh flour (Sonora and all-purpose blend) and about 60 grams of filtered room-temperature (73-75 degrees) water. This is roughly a 20% inoculation or 1:4.6 ratio of ripe starter and fresh flour.
Do I miss a feeding here and there? Of course. Just keep in mind that the microbial utopia can lose its balance in a neglected food pet which leads to off flavors as well as bread that doesn't rise as forcefully. It's important to be familiar with the "normal" smells and behavior of your starter so that you know if something is off. For less frequent baking, see "Refrigeration vs. Room Temperature" below.
Refrigeration vs. Room Temperature
I store my starter at room temperature when not traveling and feed it twice a day as mentioned above. If you only bake once every couple of weeks, you might want to consider storing your starter in the refrigerator. For refrigeration:
- Combine 25 grams of ripe starter, 100 grams of flour, and 80 grams of filtered water. Mix thoroughly.
- Leave mixture out at room temperature for about 30 minutes.
- Cover with plastic, poke a few small holes, and refrigerate.
The starter can take a cold nap for up to a week. When ready to bake, take the starter out a couple of days ahead of time and resume a normal feeding schedule to wake it up. I prefer to feed the starter four times (2 days worth) between refrigeration and mixing. Truth is, I've left mine in the fridge for two weeks with an even lower inoculation, but I usually freeze or dry some starter as a backup in those circumstances.
Another option for long-term storage is Dave Miller's Sourdough Starter Maintenance. You can leave the starter in the refrigerator for months with this method.
Data Points
I like to periodically measure the temperature of my sourdough starter since I store it on the counter without any special setup. This gives me a better understanding of how it behaves at different ambient temperatures.
Baking with a Sourdough Starter
For baking, I generally use my levain/leaven within a couple hours of it reaching the "float stage". I expand upon this in How Make a Naturally-leavened Sourdough Bread. Additional sourdough recipes can be found here.
Monthly Roundup
Subscribe at the bottom of this page for the Chic Eats monthly roundup. It includes new and updated recipes along with a grab bag of content that was interesting enough to share around the dinner table.
Loaf 13