Sauerkraut
Newsletter
Sign up at the bottom of this page for the free Chic Eats newsletter. It includes new recipes along with a grab bag of curated content that was interesting enough to share around the dinner table.
Magic Dust
Despite knowing how the story ends when making this recipe, I never cease to be amazed when the cabbage transitions rather abruptly from smelling fresh and briny to smelling like...sauerkraut. It's as if magic dust starts swirling around the jar -- like Cinderella's pumpkin turning into a carriage. Microbes possess a seemingly magical ability to transform humble ingredients into spectacular food so the analogy isn't too far off.
A handful of the cookbooks I consulted when beginning my preservation journey include The Art of Fermentation, Wildcrafted Fermentation, Fermented Vegetables, The Preservation Kitchen, and On Vegetables. Nary a batch of sauerkraut has failed me thanks to their collective wisdom. This post captures the lacto-fermentation knowledge I've synthesized including notes about salt quantity (plus a comparison chart), handling, general thoughts on types of salt (plus a comparison chart), and some recipe ideas. The process isn't overly complicated but there are ratios and steps to keep in mind for a productive and safe ferment.
If you have a clean jar, quality produce, and some salt you can make outstanding sauerkraut. Bibbidi-bobbidi-boo, as they say.
Sauerkraut Recipe Ideas
I originally made sauerkraut for reubens and all-beef hot dogs on pretzel buns (worth it just for those dishes), but found fermented cabbage opens up a world of culinary opportunities. Here are a few recipes on my to-make list.
Coleslaw
- Nancy Silverton's Twist of the Wrist uses sauerkraut in place of the fresh cabbage. The concept sounds brilliant since I always find myself wanting to bump up the acid in coleslaw.
Brussels Sprout Sauerkraut...Brusselkraut
- The Preservation Kitchen has a recipe for brussels sprouts preserved like sauerkraut and author Paul Virant noted his surprise that it's not more common. He adds champagne vinegar and aromatics but the process is otherwise the same. Brussels sprouts and cabbage are both part of the genus brassica so it's all in the family.
Dried/powdered Sauerkraut
- The ricotta sourdough pancakes (and all of the food) at State Bird Provisions is fantastic and inspired me to buy their cookbook. Sauerkraut powder is a component in the dish but ended up standing on its own as a flavor enhancer. Think of it like salt but with more depth -- add it to a sauce or toss with vegetables, potatoes, or meat. I made the powder but still need to tackle the pancakes.
Pierogis
- Serve the pierogis with a sauerkraut sauce (inspiration via Birdie Gs) or flip things around and stuff the dumplings with your fermented veggies. There are many recipes for the latter online. Years ago, I used a base recipe from the Cook's Illustrated Best International Cookbook (2007) and the pierogis turned out well. The book is out of print but widely available used, often for less than $10. Roughly 2005-2007 was when CI put out a slew of Best Of books and I own and have heavily used many of them. The recipes aren't going to blow your mind with creativity (and often need more salt) but they're excellent jumping off points.
Alsacian-style Sauerkraut with Sausage or Pork
- Some versions I've come across also add apple which sounds excellent. There's a recipe in Madeleine Kamman's The New Making of a Cook (1997 - updated from the original 1978 publication). Out of print but widely available used.
La Jota (Beans, Sauerkraut, and Pork Soup)
- Came across this one in Marcella Hazan's Essentials of Classic Italian Cooking (1992). There's a 30th anniversary version of the book (linked) and the recipe appears to be in it.
Around the Dinner Table
On Salt
If only one lesson from this book stays with you, let it be this: Salt has a greater impact on flavor than any other ingredient. - Salt Fat, Acid, Heat
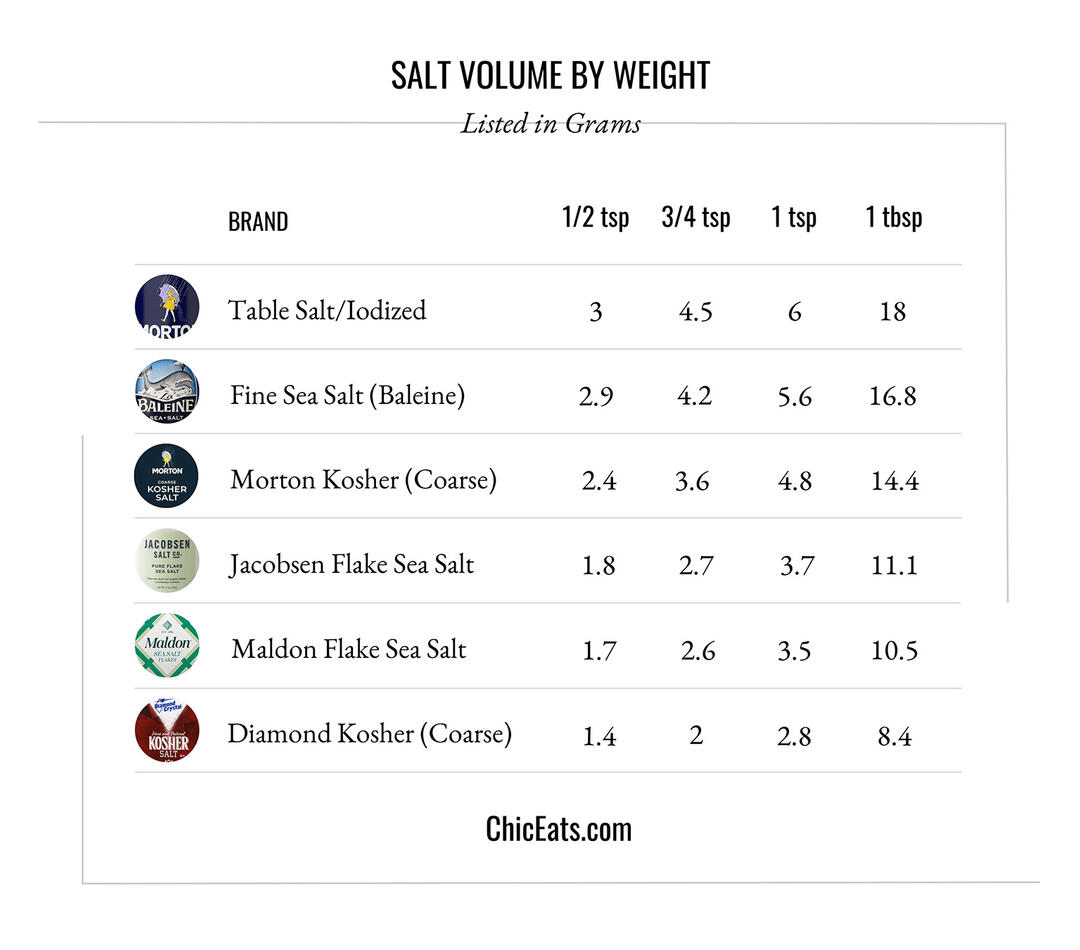
I was thumbing through The Zuni Cafe Cookbook recently and noted that Judy Rodgers preferred using medium-coarse sea salt at home and at the restaurant. She passed on iodized sea salt or sea salt adulterated with anti-caking agents. This seems to be a consistent theme in the newer books that I own. She used kosher salt as a second choice but didn't specify a brand.
Diamond kosher has been my main sodium squeeze for years but lately I've been stepping out with Jacobsen and Maldon flaky sea salt. Even for sourdough bread, I whiz coarse Himalayan pink in the spice grinder to a fine texture and keep a small jar of that in the pantry. Then there are all of the flavored salts -- habanero, rosemary, and smoked. None of these salts are the same amount of sodium per teaspoon so it can require mental gymnastics trying to convert between them. That said, if you weigh your ingredients you can jump from rosemary to Himalayan and back to Diamond without screwing up a recipe. Salt is salt when you drop the measuring spoons.
All of that said, I was looking for some consistency and ended up averaging weights from Serious Eats, NYT, Smitten Kitchen, Cook's Illustrated, and a couple of other sites. The weight for Diamond kosher was steady across the board but Morton and iodized table were all over the place. I compared the averages against what the manufacturers state, weighed them myself, then came up with a cheat sheet (below). Pretty much every chart on the internet is slightly different but these are the numbers I plan to standardize on.
Since most recipes call for Diamond kosher, Morton kosher, or iodized table it's easy to convert to whatever I want to use. For example, if a recipe says 1 teaspoon of table salt then I just sub in 6 grams of my salt of choice. Salt texture, ability to dissolve, etc. all have to be taken into consideration with baking but that's beside the point. If nothing else, the chart demonstrates how much less salty 1 teaspoon of Diamond kosher salt is compared to Morton and iodized table salt. This might explain why some dishes just "don't work" when it's not clear what brand the recipe writer was using. Yes it's best to taste and season throughout the cooking process but that's not always possible with certain recipes (especially with baking).
Full disclosure is that I have to correct and/or clarify the salt in several archive recipes on this site. I'm older and wiser but there are only so many hours in the day.
On Fermentation
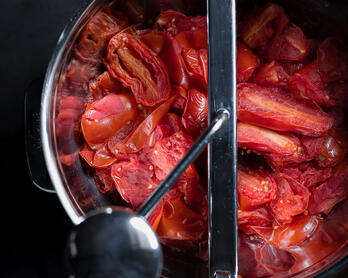
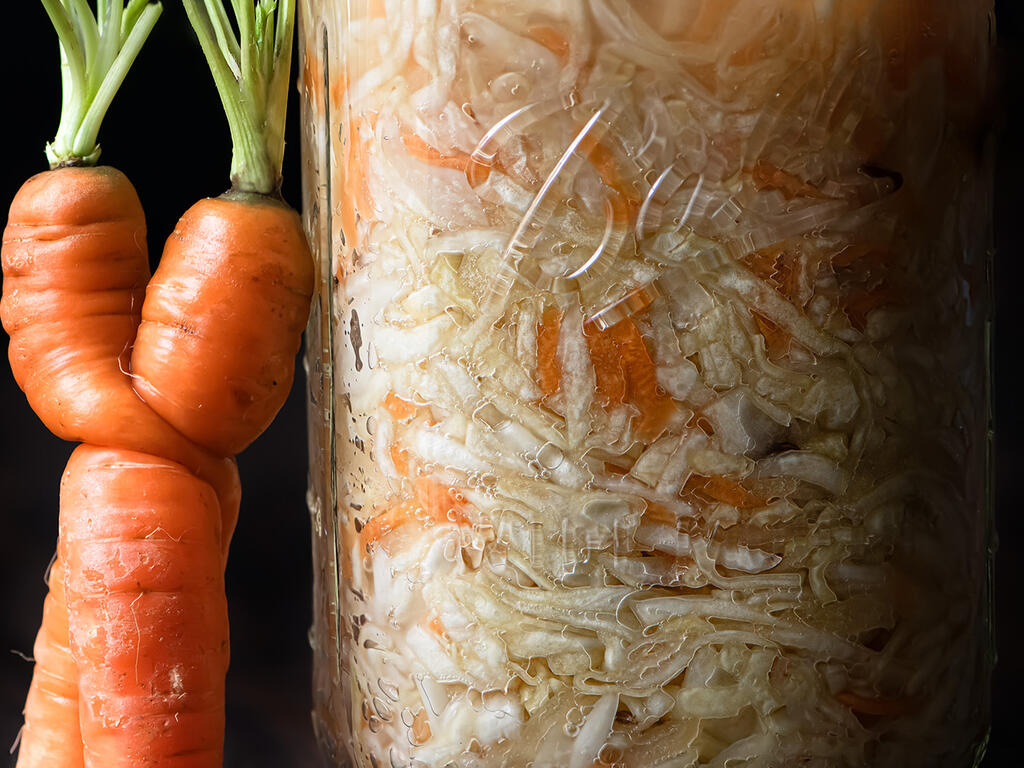
The marvel of bubbly life pictured at the top is simply cabbage, apple, carrot, and salt after a few days at room temperature. With the right conditions -- anaerobic environment, balanced salinity, and temperature -- the "good" bacteria that rides along with the vegetables can go to work transforming natural sugars into lactic acid. And that's what sauerkraut is, cabbage that has been preserved through acidification. The acidity along with its sidekick salt make the vegetables both safe to eat and delicious.
One distinction that wasn't crystalized in my mind until making sauerkraut is the difference between wild fermentation and culturing.
In the case of sauerkraut, people typically rely on bacteria that are present on cabbages and all raw vegetables. Fermentation based upon organisms spontaneously present on the food or in the environment is known as wild fermentation. The contrasting style of fermentation, in which specific isolated organisms, or established communities, are introduced to a substrate in order to initiate fermentation, is known as culturing. - The Art of Fermentation
Fermentation cultures are better known as starters or mothers (also food pets) in the bread baking community. My food pet is named Moomin and it's pleased to meet you.
Recipe Tips
Salinity
There are respected authors who don't measure their salt and instead suggest "salting to taste" when making sauerkraut. I'm not inclined to disagree with people more experienced than myself and definitely think it's worth tasting the salted cabbage before stuffing it in the jar. With that said, my preference is to measure the salt for both consistency and specificity because that's my vibe. There are already enough factors that make each batch unique.
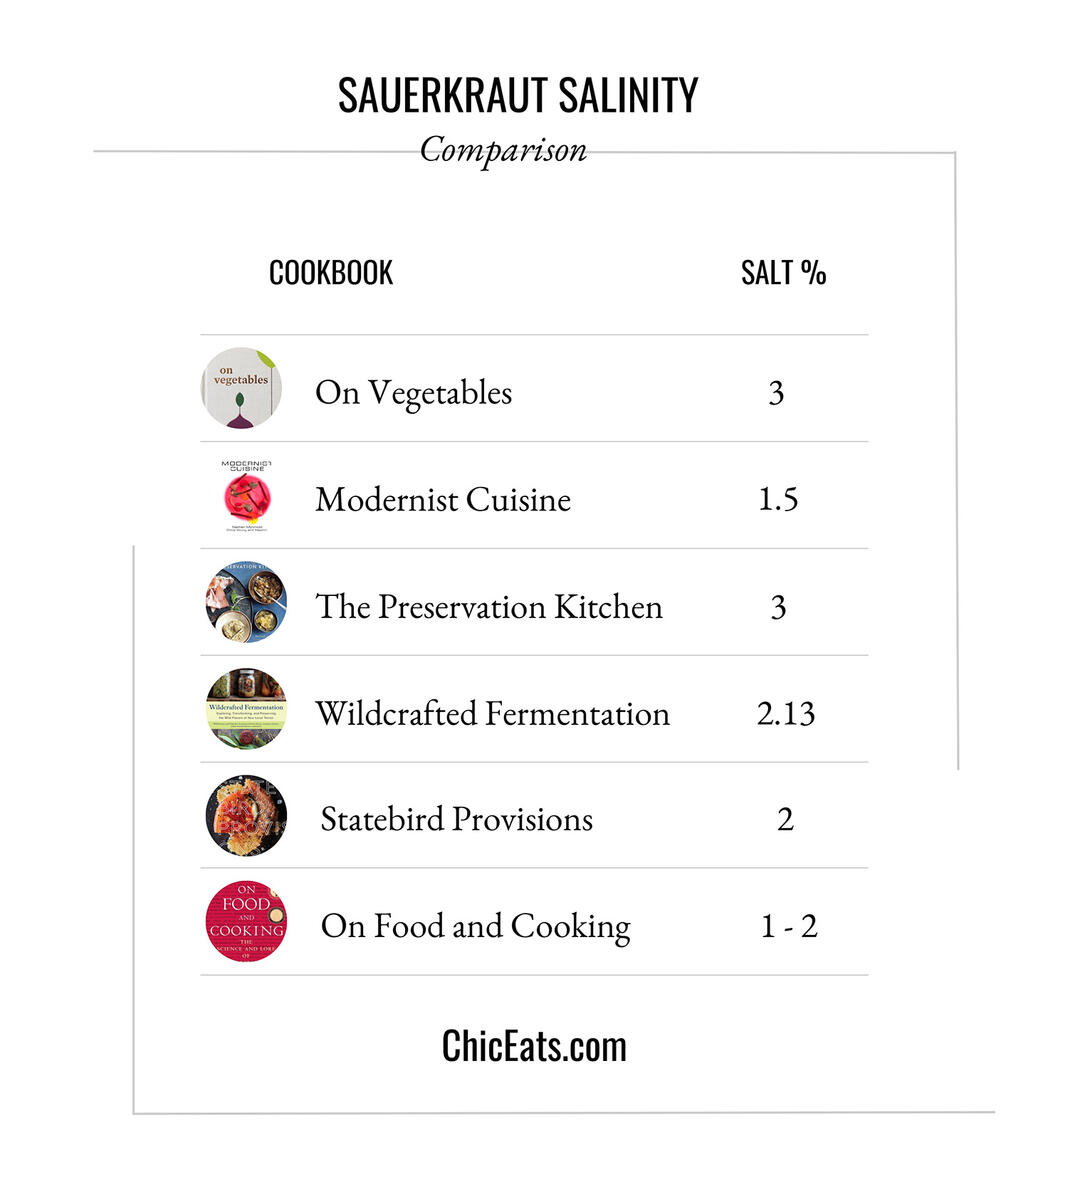
I settled on 2.45% for my sauerkraut which means 100 grams of cabbage needs 2.45 grams of flaky sea salt. Below is a comparison chart showing what some of the books I referenced suggest, the overall average being 2%. You may decide to use more or less than I do but in all cases my recommendation is to double check that the ratio of salt to cabbage correctly reflects your plan.
Cleanliness
I have yet to come across any suggestions that sterility is necessary when fermenting something like cabbage. I run my jars through the dishwasher, wash the lids/bands with hot soapy water, and make sure my work surface and hands are clean in the the same way I would for everyday cooking. It's about being careful, not neurotic.
Incidental microorganisms that inevitably are found in non-sterile though clean environments cannot generally gain a foothold in a fermentation substrate. This is because the ferment either has its own indigenous microbiota (as in sauerkraut and traditional wines), or has had a critical mass of cultures introduced (as in yogurt, tempeh, and most contemporary beers). We are living in a microbial world, and these processes all developed under decidedly non-sterile conditions. - The Art of Fermentation
Every time I read that last line my brain can't help but insert, "We are living in a microbial world, and I am a microbial girl..." to the tune of Material Girl. Just can't unhear it.
Water
It's best to avoid tap water when fermenting since the chlorine and other contaminants can give your microbes a hard time. If you have to add brine to your sauerkraut, opt for filtered water. On that note, Fermented Vegetables recommends against adding any salt water to the jar if the cabbage isn't quite beneath the liquid's surface. Added brine can apparently make the cabbage mushy. I haven't found the need to add brine during the fermentation process but do sometimes add a small amount of brine once the cabbage is refrigerated. The liquid can vanish into the cabbage as the fermentation slows. So far I haven't noticed any negative effects but maybe added brine is more of a problem during fermentation.
pH
For the most part I can tell when my sauerkraut is ready to be refrigerated based on smell, taste, and activity. That said, I still measure the pH every day while it's at room temperature. Checking in on the acidity gives me peace of mind and the science is fun. Smelling and watching your ferment each day (prior to refrigeration) will help tune your senses into where the microbes are on their journey to delicious.
A few quick notes on pH:
- The lower the pH, the more acidic the ferment.
- The suggested "safe" range for fermented food is anything below 4.6. The liquid in the jar on day 1 will be higher than 4.6 which is expected and fine. Preserved lemons and limes (for example) have a safe pH from the get-go because the citrus juice is already acidic.
- My sauerkraut usually ends up around 3.5.
Anaerobic Environment
An anaerobic environment is one where the oxygen has been pushed out or removed. It's important to press the cabbage down so that it's submerged under the brine and remove the stray bits that refuse to stay under the weight. The stragglers are less of a concern once the brine is at the right acidity, but in the beginning the floaters might invite unwanted bacteria/mold to the party. All that said, don’t be paranoid. As Pascal mentioned in one of his workshops, if you work with your ferment every day you won’t get mold growth because nothing will sit still long enough for a problem to develop. I've found that bit of advice to be true.
I tried a couple of approaches for keeping the cabbage submerged including a Ziploc bag of water (hard pass for me -- didn't work well, broke, also not really reusable) and using a large cabbage leaf. Glass weights were the easiest to use and clean and are the only "tool" I highly recommend. Some people use natural stones that have been boiled to ensure cleanliness. I actually like that concept since it has a rustic romantic feel but didn't have any stones on hand. If you're really struggling with the stray cabbage strands, using a cabbage leaf underneath the weight will do the trick.
Opening the Jar
There are a spectrum of opinions when it comes to working with your ferment. Some suggest it's best to avoid opening the jar to avoid contaminating the contents while others (like Pascal Baudar) say working with your ferment is the very thing that will help prevent it from developing mold or other unwanted qualities.
I'm in the latter camp and interact with the sauerkraut once or twice a day while it's sitting at room temperature. Clean hands and utensils are important but otherwise I'm not worried that this process will have a negative impact.
Before You Go
As with bread baking, there's nuance when it comes to making sauerkraut -- really with all fermentation. State Bird Provisions mentions how salt quantity impacts speed of fermentation which ultimately impacts flavor. Fermented Vegetables suggests that once you get through the initial fermentation and the pH is in a safe range, slowing the fermentation by storing in a cooler place (but not the refrigerator) can add subtle differences. I'm not to the point where I tweak these aspects but feel it's important to acknowledge that no one recipe is "correct". There's definitely more to discover beyond what I've written here and that's where some of the books I've mentioned make a great resource.
Farmers | Artisans
I make an effort to source my food from California artisans with a special focus on the Santa Monica Farmers Market. Below is a list of the folks who contributed to this dish.
- Weiser Family Farms // Conehead Cabbage, Carrots
- The Garden Of... // Conehead Cabbage, Carrots
- Flora Bella // Cabbage -- They don't have their Copenhagen cabbage this year but it was so outstanding that I'm giving a special shoutout.
- Cirone Farms // Apples (Pink Lady or similar tartness)
- Cayuma Orchards // Apples (Pink Lady or similar tartness)
Flora Bella Farms - Santa Monica Farmers Market
Tools
- Scale - This is my workhorse -- a sturdy cooking companion that repeatedly gets covered in flour, sauce, or whatever else is flying around the kitchen. I recommend keeping liquids away from the screen since they can find their way inside. That said, the scale seems to dry out and keep on measuring. Note: My original scale with the black pull-out display is now made in all stainless steel.
- 32-ounce Wide Mouth Jar(s) + Extra Lids
- Weights - I tried a couple of the DIY methods for holding down my ferments and ultimately just bought some wide-mouth and small-mouth weights. They work well, don't take on any odors, and are easy to use and clean.
- Mandoline - This tool has a beautiful design and is really easy to use and clean.
- Pounder - I use my small rolling pin and it works fine for a 32-ounce jar.
- Cuisinart Food Processor - I've had this food processor for 10+ years and run the bowl and blade through the dishwasher half of the time without issue. It's a solid machine.
- pH Strips - Embrace your inner Bill Nye.
My Favorite Cooking Tools spotlights the kitchen equipment I’ve owned and used for years from bread baking to coffee brewing.
Ingredients (Fills a 32-ounce jar)
This is my base recipe but the sky is the limit when it comes to mixing things up -- maybe add peppers or different spices. Many of the cookbooks mentioned in this post have slightly different recipes and/or offer variations on the theme.
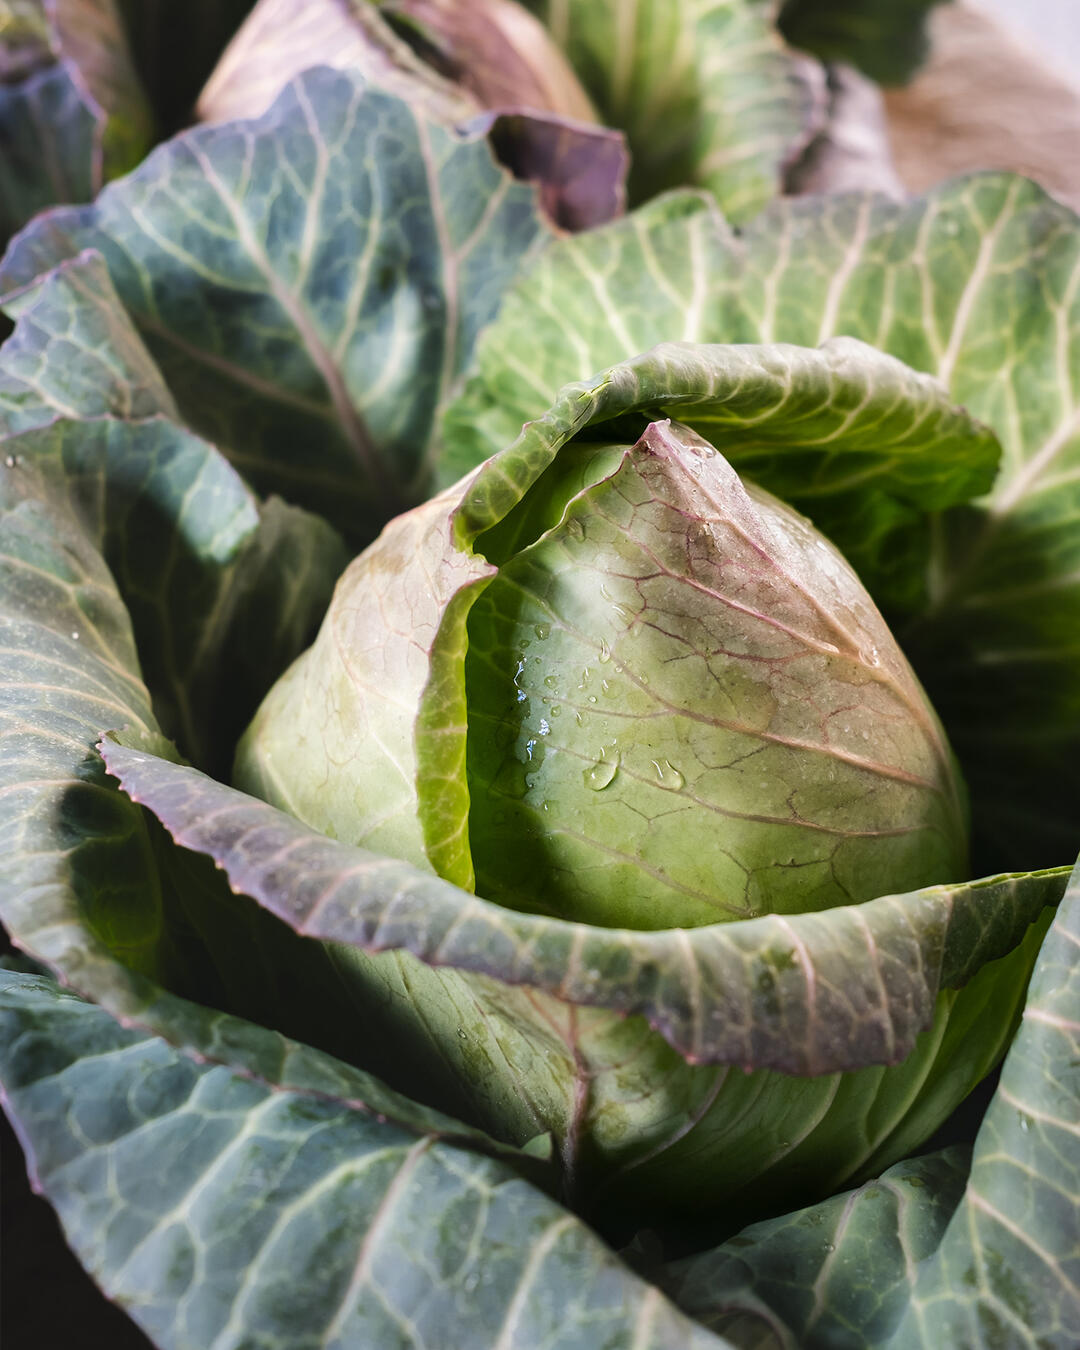
- 500 grams shredded cabbage Note: One small/medium conehead cabbage that was heavy in hand yielded this amount.
- 55 grams shredded carrots
- 60 grams shredded apple
Total produce weight is 615 grams // 100%
- 15 grams flaky sea salt or Diamond kosher // 2.45%
- 1/4 teaspoon (approximately 1 gram) caraway seed
Instructions
Prep
- Jars, bands, lids, weights, and pounder (if using) should be clean and dry. As already mentioned in Cleanliness, I put the jars through the dishwasher and wash the bands, lids, and weights with hot soapy water.
- Remove the cabbage's outer leaves. Humans touch them (as Pascal Baudar notes), there can be some mold -- generally the cabbage is pristine underneath that first layer. Pull an extra clean leaf off and set aside if you want something under your weight.
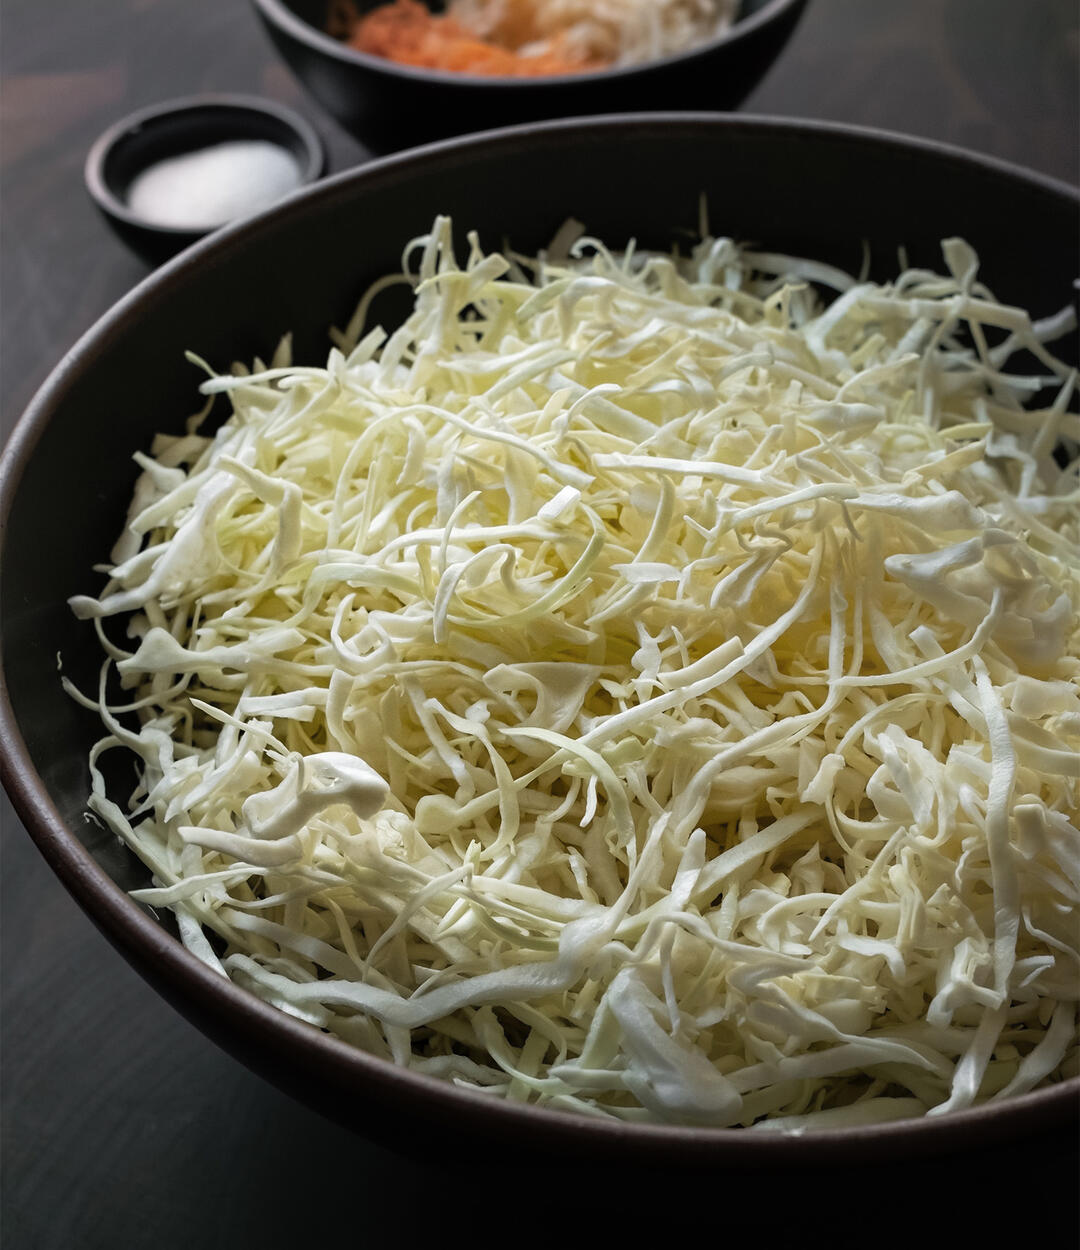
- Cut out the core and shred the cabbage. I use this mandoline open to the widest setting.
- Shred the apple(s) and carrot(s) in a food processor and set aside in a second bowl.
- Weigh your shredded ingredients. Whatever that number is, multiply it by 2.45% and that's how much salt you need.
Sweat
- Combine roughly 1% of the salt (a couple grams per the above recipe) with the carrot and apple and toss. Set aside.
- Add the rest of the salt to the cabbage and gently massage. The vegetables will now need to sweat it out for 10 minutes. Note: Conehead cabbage has a more tender texture (relatively speaking) so I don’t massage as firmly as many recipes suggest. If you're using heartier cabbage, massage for a minute or two until you don’t hear the salt clanking on the bottom anymore and the greens are becoming damp.
- After 10 minutes, the cabbage will be glistening as if just washed. Give the cabbage another gentle massage and set aside for 15 more minutes. Who doesn't like a good tidying up window? Once the time has elapsed, pick up a handful of the cabbage and squeeze -- it should give off liquid. About 20-30 minutes has passed at this point.
Stuff
- Add the apple, carrot, and caraway to the cabbage and mix thoroughly. Transfer the cabbage and all of the juices to the jar then press it down. You're not looking to beat the cabbage up but you do want to push out the air bubbles since the goal is an anaerobic environment. Some people use wooden pounders but my small rolling pin is the the perfect size.
- Place the weight on the cabbage and press down firmly -- the liquid should bubble up and be above the produce. The jar should have at least 1-inch of head space (empty space). Fish out any stray pieces that float to the top and wipe the inside/outside of the rim with a clean towel. See extended notes about handling under Anaerobic and Opening the Jar above.
Stop and Smell the Cabbage
- The fermentation progress can be assessed as much by your senses as by the pH so smell your jar and make a mental note before putting on the lid. It’s pretty exciting when you open up the jar one day and the cabbage suddenly grabs you by the jaw with its sauerkraut notes.
Covering and Storage
- Put the lid on, screw shut, then unscrew the lid a quarter turn -- that will allow gases to escape. Place the jar in a bowl away from light. I try to store it in the 65F to 72F. Note: Every ferment is different in terms of activity and sometimes I overfill the jars and the brine threatens to bubble over, hence the bowl.
Checking In
Once or twice a day (depending on how active the cabbage is) I do a quick check-in with my microbial friends. Clean hands and utensils are good measures to take. All in it only takes a minute or two.
- Open the jar, take a smell, then press the weight down to compact the cabbage and push the bubbles to the top. If some foam/bubbles collect on the surface, scoop those out with a spoon taking care not to remove any of the brine.
- Measure the pH. The milestones I look for are below 4.6 (which is considered "safe") and then 3.5-3.7.
- Push down or fish out any produce bits that float to the top.
- Every couple of days, I wipe the inside of the jar's rim.
- Put the lid back on (double check that the cabbage is completely submerged), unscrew a quarter turn, and return to the bowl.
Are We There Yet
- I taste the cabbage once the pH drops below 4.6 just to see where things are at in terms of flavor. All ferments are unique but in my case this seems to happen around day 4 or 5.
- Somewhere around day 7 to 10 day the fermentation and bubbles start to slow and the pH ends up in the 3s. I taste again and generally refrigerate the sauerkraut at this point give or take a couple of days. Some people suggest a minimum of 2 weeks fermentation, others a month. Once the cabbage in the safe pH range (under 4.6) it's a matter of personal preference. The pH eventually settles at 3.5 while in the refrigerator.
Storage
- I like to check on the jar for a couple of days after refrigerating. Sometimes the liquid vanishes leaving the sauerkraut exposed. I mix a 2% brine and add just enough to cover -- usually only a few tablespoons.
- The sauerkraut will last for weeks (months?) but it's always gone before I can test just how long it will keep.
Newsletter
Sign up at the bottom of this page for the free Chic Eats newsletter. It includes new recipes along with a grab bag of curated content that was interesting enough to share around the dinner table.